Tag Archives: recipe

Summertime tart

I do pastry. I do bread, too. But I can’t do cakes – or rather there are a limited number of cakes which I can do, and which work well. But something like a Victoria sponge? Touch and go. However, pastry – no problems. So when I know people are coming round I don’t make a cake, I make a tart. Or perhaps I’d better call them flans, to avoid any sniggering at the back. Nope – tarts they are, and tarts they will remain. Or tartes, since the origin of mine is indisputably French.

tarte aux brugnonsThere is something about a slice of fruit tart served on bone china, with a healthy dollop of cream or Greek yoghurt. It somehow feels special, more special than a slice of Victoria sponge – given the nature of my sponge, this is not surprising, mind. So when I knew I had people coming round and spotted that the Co-op had suddenly received a consignment of white-fleshed nectarines and were selling them off cheaply for some reason (I’m not complaining), I felt the call.

So what about pastry? Is it phenomenally difficult? I don’t think so, but then there are people out there who wouldn’t believe that a grown woman could mess up a Victoria sponge. There are all sorts of stories about chilling your hands in cold water or – I kid you not – wiping ice cubes over the surface, and lots of people have unorthodox methods that work for them. You do need to keep pastry cool, of course, but my hands aren’t particularly chilly, my worktop is unbrushed by ice cubes and my pastry still works. Just chill it (man). As long as the pastry is a fine crispy shortcrust, it doesn’t really matter how it’s made.

Anyway, here goes, my fruit tart made with pâte brisée, a version of the classic French shortcrust which I have found works really well. In the UK, it’s usual to rub the fat into the flour first; in France you don’t. I go for the British way because I just hate breaking up raw egg with my fingers (eeeeuuh).

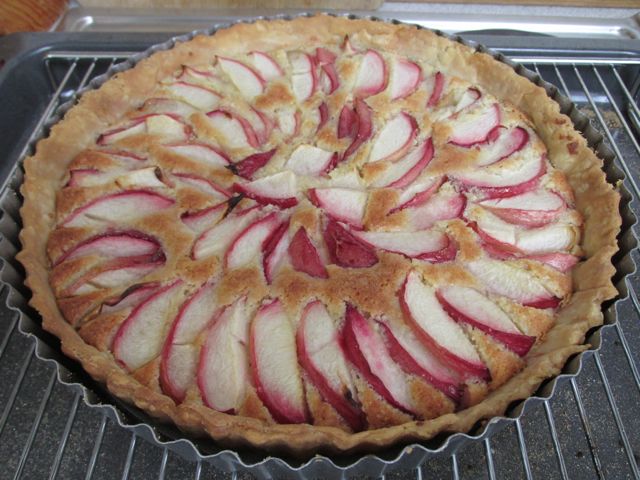
Nectarine tart with almonds
for a 23cm loose-bottomed tin

For the pastry:
50g butter, at room temperature
125g plain flour
I small egg

Make the pastry first, because it needs to chill for 30 minutes and will be baked blind, anyway. Put the butter into a large bowl and cut it into small pieces with a knife. Sieve the flour into the bowl and then rub the two together with your fingers until the mixture resembles fine breadcrumbs – this always takes longer than you think. Then add the egg, break it up with a fork and mix it in well. The pastry will come together gradually into a soft dough but don’t knead it like bread, just press it together gently and add a little very cold water if necessary – but it probably won’t be. Form it into a ball, put it into a clean bowl and cover it with clingfilm. Chill in the fridge for 30 minutes.

Pre-heat the oven to 200 degrees C, 180 fan, gas 6 and grease a loose-bottomed quiche tin. Lightly flour the worktop and take the pastry out of the fridge. Warm it up in your hands a little to soften it, then carefully roll it out into a circle, changing direction and turning it over; keep the worktop floured while doing so. Lift the pastry up, over the rolling pin, and carefully drape it over the tin. Then gently manipulate it into the corners and folds of the tin (patch any gaps; dip a pastry brush in milk and stick a new piece of pastry on top). Trim off the excess, ready for baking the case blind. Prick the bottom of the pastry and line it with a generous circle of greaseproof paper, tip a load of dried pulses or baking beans on top of the paper and bake for 15 minutes. Set it aside to cool for 10 minutes, then remove the baking beans and paper and let the case cool completely.

tarte 2For the filling:
80g butter
80g vanilla sugar
1 large egg, beaten
2 tsp Amaretto (optional)
100g ground almonds
1 tbsp flour
5 small nectarines

Pre-heat the oven to 200 degrees C, 180 fan, gas 6.

Cream the butter and sugar until light and fluffy. Gradually beat in the egg, adding a little of the flour as you do so. Then stir in the Amaretto, ground almonds and the rest of the flour; mix everything together well. Put this mixture into the tart case and level it down. Cut the nectarines into slices and put them on top of the filling in a circular pattern, saving the smaller slices for the inner circles. Then sprinkle a little more sugar on top and bake the tart in the oven for 10 minutes. Lower the temperature to 180/160/gas 4 and cook for another 20 minutes or so – check towards the end to make sure the fruit isn’t catching (a little caramelising is fine; burning is not, ho ho, don’t ask me how I know).

Serve warm (rather than hot) or cold. Cream or good Greek yoghurt served on the side is wonderful. Sigh.

Hot weather soups

Today the title of this post seems a little optimistic, but I’m hoping I can entice the warmer weather back by stating it as a fact. Well, it might work…

I am, without any doubt, a soup addict but at this time of year even I go off them a bit. After I abandoned a bowl of mushroom soup the other day I decided I needed an cold alternative, and one that wasn’t gazpacho. So I turned to one of my favourite books, Lindsay Bareham’s Celebration of Soup, and there were a few interesting suggestions, though not a lot – but many of them foundered on the fact that I’m lactose intolerant. I have to avoid milk and cream, and though I could now take a tablet which would enable me to digest lactose, many years of white liquids making me ill means I contemplate them with distaste (but yoghurt is fine; the bacteria in yoghurt help generate enzymes which digest lactose; go yoghurt).

cold soupThen I went back to some of my other, often older, books. An obvious choice, and a version of which does appear in Soup, was a Middle Eastern one, a classic which crops up in many sources: cucumber, yoghurt, garlic, mint. A lot of the versions I found used cream, like Lindsey Bareham’s, so I decided to go back to the absolute basics and see if it was really necessary…

Cold cucumber, mint and yoghurt soup
(serves 2, generously)

a sliver of butter
1 tsp olive oil
2 shallots, peeled and chopped
1 cucumber, peeled, deseeded and chopped
1 clove of garlic, peeled but whole
a good handful of fresh mint, chopped
500ml natural yoghurt
salt and white pepper

Melt the butter with the oil in a heavy-bottomed pan over a gentle heat. Add the shallots and allow them to cook – without browning – for a few minutes and then add the chopped cucumber. Cook for another 5 minutes, stirring and checking that there’s no hint if browning, and then add about 300-400ml of water – enough to cover. Cook, very gently, for 5 minutes more. Keep checking that there’s enough liquid and add a little more if necessary. Add the chopped mint and cook for another 10-15 minutes, or until the shallot and cucumber are really soft and the liquid has cooked well down.

Put a sieve over a large bowl and empty the vegetables into it; remove the garlic clove and discard it. Work the soup through the sieve with a wooden spoon. Discard any bits which won’t go through – there shouldn’t be much – and scrape any pulp off the bottom of the sieve into the bowl. Test the soup base; by now it should be tepid. Add the yoghurt and stir it in (a whisk is useful) until it has a texture similar to single cream; thin with a little water if necessary. Check for seasoning, cover the bowl and chill in the fridge for a minimum of 2 hours.

(Removing the garlic after cooking is optional. Including it can make the soup taste overwhelmingly garlicky, but if it’s mild you could leave it in – chop it roughly before cooking, though.)

mintI grow a lot of herbs, and currently have six different mints; for this soup I used a mixture of spearmint, garden mint and a Moroccan mint, plus something described as ‘chocolate mint’ on the label. Happily, it doesn’t taste remotely of chocolate…

I also grow lovage, and that gave me an idea for another soup, made along the same lines:
celery and lovage soup.

I won’t bother to write out all the method again, as it’s essentially the same. For two, I used a whole head of celery, including the leaves, and 4 shallots; no garlic. I trimmed the celery but didn’t de-string it before chopping. I cooked these gently down, this time using a neutral rapeseed oil, and needed to add more water so they didn’t catch; they also took longer. I added a good handful of chopped lovage leaves after 25 minutes, and cooked the vegetables for another 10. The pushing through the sieve produces more pulp for discarding – mostly celery strings as far as I could see – and I had to be careful when scraping the pulp off the bottom of the sieve as some of the strings worked their way through at the end. I didn’t need quite so much yoghurt to get the right texture this time. This celery and lovage soup has a delicious, almost lightly curried flavour, and I ground some black pepper over it before serving rather than adding white pepper before chilling. Yum.

Very refreshing, and doubtless there’ll be more experimenting before the summer (HINT, weather gods) is over. I can’t do without my soups.

I can do without some things, though. Several of the authors of the older recipes I uncovered in my ridiculously large collection of cookery books obviously felt that subtle colour wasn’t good enough. Personally, I don’t see lots of green food colouring as a necessary soup ingredient (eek)…

Unseasonably cold? That means soup!

As a gardener, I do keep a sort of record – and so I know that it’s often chilly and stormy at this time of year, here on the west coast of Wales. I’ve often ended up having to replant things which I was rash enough to put in the veg beds, and I generally have the last fire in the woodburner about now. This year, however, I seem to have forgotten all that and have been taken by surprise. My immediate reaction, though, wasn’t to go out and chop logs. It was to make soup.

I don’t tend to have soups in summer; it seems wrong, on some sort of fundamental level. Don’t get me wrong; I like cold soups but it seldom occurs to me to make one. Whereas it’s almost the first thing I consider for lunch on a cold, rainy, windy day – in May. Grumble.

So I hit the recipe books and notes in search of inspiration, given that I’d also just come back from Aldi with a supply of veggie bargains. No more shopping; time to adapt and improvise and come up with something which would work. Because it is, ostensibly, spring I went to various Italian recipes – Italian food somehow seems less depressingly wintry than what’s happening outside – and ended up with a variation on an old favourite…

One word: I usually have home-made tomato and herb passata in the freezer; it’s a godsend if you grow too many tomatoes, as I always do (they’re as bad as the beans). By now I’m gearing up for the new growing year, and am keen to use what’s in stock; I’ve got another three boxes of this to go. But a bottle will do just as well, though adding a little basil would be good.

Emergency Minestra di Ceci
serves 4

Soup yum1 small red onion
1 banana shallot
5g butter
1 tsp olive oil
3 sticks of celery
2 small carrots
1 red pepper
350ml tomato passata
1 x 400g tin of chickpeas
1 bay leaf
1 sprig of thyme

Peel and finely chop the red onion and the shallot. Put the butter and oil in a heavy pan or casserole and heat them gently, then add the chopped onion and shallot. Sweat them over a low heat for 5 minutes or so, making sure that they don’t catch. Chop the celery and carrots finely while the onions are cooking, and then add them to the pan too. Continue cooking for another 5 minutes or so, until the onion and shallot are transparent and softening. De-seed and chop the red pepper, also finely, and then add it to the pan as well. Continue cooking for another 5 minutes, still making sure that nothing is burning by stirring regularly (and keeping an eye on the pan, of course).

Add the tomato passata and increase the temperature; add some water to bring the level of the liquid up to cover the veg. Drain and rinse the chickpeas. Put the bay leaf in the soup and pull the leaves off the thyme and scatter them in as well. Bring the soup almost up to the boil, then lower the heat and simmer it for about 10 minutes, or until the carrot and pepper are beginning to get nice and soft. Tip in the chickpeas and cook for a further 5 minutes or so – longer if you want the chickpeas to disintegrate slightly; you may need also to add a little more water to get the soup to the consistency you prefer, but it should be thick. (If intending to freeze portions, bear in mind that they will be cooked more when reheated and don’t overcook the chickpeas at this stage.) Add seasoning to taste and serve as soon as the vegetables are done to your satisfaction, accompanied by chunks of bread.

not a good ideaNow I have the freezer bulging again. Nothing better than soup for freezing. And nothing better for freezing gardeners than a bowl of hot soup.

But there’s a lot that’s better for cameras than trying to photograph soup while it’s actually cooking… happily the new camera seems to have recovered. Not sure about me, but there you go.

Ooo matron (or the love of sausages)

What is it with Brits? When it comes to humour, most of us dearly love a double-entendre or anything scatalogical. When I was doing stand-up I sometimes felt that I could abandon my act and say ‘bottom’ for 20 minutes, and get the same hysterical response. Mind you, I was never brave enough to try it, not even at the midnight show at the Comedy Store.

So it’s probably best to confront all the Carry-On style double entendres immediately. This post is about sausages. That’s right, sausages: ‘An item of food in the form of a cylindrical length of minced pork or other meat encased in a skin, typically sold raw to be grilled or fried before eating’, to quote the OED, and absolutely nothing else. OK?

We’re very lucky round here in that many of the butchers take pride in their ‘item[s] of food in the form of a cylindrical length of minced pork’. Perhaps it’s not surprising; there’s a long-established tradition in Britain of local pig-rearing and smaller-scale butchery. Admittedly the small-scale butchery nearly disappeared, but, like some other food traditions – decent breadmaking, for instance – care and attention are again being given to pork products, and on a satisfyingly artisan basis.

Bewick cottagerAnd, even if we haven’t all quite got back to the point where there are piglets playing about while we hang out the washing, the tradition of small-scale pig-rearing is also beginning to reappear.

Some of my friends, for instance, have a pig-sharing thing going on – one rears the pig, the rest share the expenses and will get a share of the haul. But it’s not for me, despite the fact that I do have an old pigsty available. First, the neighbours would probably object, especially the Chapel next door; second, the pigsty is now a garden store and I’d have to clear it out if I wanted to keep a pig. Third, I must admit to being a bit nervous around pigs: I’m no Lord Emsworth, and they are big. One farmer I know had an enormous evil-tempered sow straight out of Celtic myth, and she scared even him (the sausage maker got her in the end; while it would be exaggerating to say that his village put the bunting out, many people were relieved – she’d been prone to escaping).

And, of course there’s that other reason: I can get good sausages and bacon easily, and  without all the fuss, bother or inevitable deterioration in neighbourly relations. The Spar shop in my village houses an award-winning sausage maker; there are multiple delicious choices at the local farmers’ markets and even the local Co-op does a good selection in their premium range. I’ve tried many of the flavouring options available and am currently coming down in favour of cracked black pepper sausages, either from local producers Oinc Oink (a happily bilingual name – there’s no ‘k’ in modern Welsh) or Ynysgyffylog. They’ve got enough punch to stand up to all sorts of other ingredients and are perfect for when I want exactly that impact but without the garlic of my local butcher’s best Toulouse-style sausage (itself ideal in cassoulet). And when I can’t get any of those, largely down to bad planning on my part, I get the Co-op’s Lincolnshires. Very good, very sage-y, as a good Lincolnshire sausage should be.

Ever since I discovered a tasty recipe in an old copy of Katherine Whitehorn’s Cooking in a Bedsitter I’ve done much more than simply bake / fry / grill sausages and serve them neat, as it were (I did adapt the recipe, which was from 1974 – tinned carrots? I think not…). A good sausage is a good sausage, no matter how you cook it – and a bad one will always be a disgrace, much more appropriately found – and left – in CMOT Dibbler’s tray in Ankh Morpork than in my sandwich / bake / ragout / salad. Their potential is enormous, as indicated by all the /// alternatives. So here’s my latest recipe, a warm salad. The weather isn’t summery enough for a cold one. Yet.

saladWarm potato and sausage salad
Serves 2

The recipe uses cooked sausages. I bake mine, while I’m cooking something else, at about 180 degrees, 160 degrees fan / GM 4 for approximately 30 minutes (depending on their thickness). I then let them cool completely. It’s the spuds that are warm, not the bangers…

200 – 250g new potatoes
6 well-flavoured sausages, baked, chilled
3 sticks of celery
2 banana shallots or 1 small red onion
2 tbsp mayonnaise
1 tbsp Greek yoghurt
1 heaped tsp Dijon mustard
a little salt
lots of black pepper
a large sprig of parsley, chopped

Chop the potatoes into chunks no bigger than 2cm, and put them in a pan of cold water. Bring to the boil and simmer until cooked. While the potatoes are cooking, chop the cold sausages into slices and put them in a large bowl. De-string the celery sticks and chop them up too, then add to the bowl as well. Cut the shallots in half and remove any greenish centres which can be bitter, then slice them into rings and add to the bowl as well.

Test the potatoes and check that they are just tender, then drain them well. Add them to the bowl and then quickly add the mayo, yoghurt and mustard. Add a little salt and turn the salad over carefully with a wooden spoon; the potatoes should not break up, but everything does need to be covered in the dressing. Add lots of black pepper and a good handful of chopped parsley and stir gently once more, then put it onto warmed serving plates. Serve immediately, with chunks of bread.

(And then steal any left-overs…)


To ramson or not to ramson…

Ramsons – aka wild garlic, stink bombs or stinking nanny (I kid you not), correctly Allium ursinum, has been, for the past couple of years, the hot fave trendy wild food. Think forgaging, think ramsons: that’s been the message in some quarters.

ramsonsThe plants are easy to identify (even easier once they’re in flower), they’re easy to gather and they’re prolifically present in hedgerows and woodland – and my garden – just about now. And now’s the perfect time, because the leaves are still young. Plus it’s the start of the hungry gap, the time when stored fruits and vegetables have been used up and the new season is yet to get going.

The recent popularity of wild garlic is nothing new; it’s been a useful herb for time out of mind. And that extends to more recent history too; the leaves were frequently collected and used during WW2 as a substitute for the flavouring previously provided by onions.

But – and I’m saying this as possibly the most enormous fan of all things allium since the Roman invasion of Britain – ramson leaves often leave me underwhelmed. Either they’re too strong or too slimy or they look revolting once cooked or they’re tough or – well, they can really, really dominate everything else. I recently slung some in a Thai green curry to see if they could hold their own, and they could. Roger Phillips almost left ramsons out of Wild Food – two sentences, no recipe –  and I’m coming round to the point of view that he might have been right.

That’s despite the fact that wild garlic is so common round me that the air can take on a distinct and powerful garlic scent – smell – at this time of year. Places are even named after it: Crafnant near me, just outside Beddgelert, means ‘valley of the wild garlic’…

But it goes against the grain, leaving such a prolific resource untouched. I’ve found two uses I do like, and like very much. The first is a wild garlic oil, made by steeping some young leaves in olive oil for a few days.

The second use is more traditional:  with fish.IMG_8576 Gerard, after all, said the leaves made a good sauce for fish but fit only for those with ‘a strong constitution and labouring men’. I’m not the latter, and I probably haven’t got the former, so I use it to wrap round the fish instead.

Salmon wrapped in ramsons
serves 2

5-6 ramson leaves, young and fresh
2 fillets of salmon
1 slice of lemon, and a squeeze as well

Preheat the oven to 200 degrees conventional, 180 degrees fan, GM 6. Spread out a piece of foil big enough to wrap the salmon generously. Put two of the leaves on the foil, cut the slice of lemon in half and put a piece on each leaf. Then put the fillets – head to toe, slim end next to fat end – on top of the leaves. Tuck more leaves between the fillets and lie two on top. Then pull the foil up around the fish and squeeze in some lemon juice. Bring the foil over the top and fold the sides together into a loose, but well-sealed,  parcel.

Put the parcel in an oven-proof dish and put it in the oven for 15 minutes. Carefully unwrap the parcel – the steam inside is hot – and check that the salmon is cooked, which will depend on the size of the fillets: they should be opaque all the way through and not transparent. Reseal and return to the oven if necessary for a few more minutes.

Once cooked, unwrap the fish and remove the leaves from the top and middle. Carefully lift the fillets from their parcel and off the lemon and bottom leaves, and put them on a plate to cool. Serve with a green salad (without ramsons, unless you’re addicted), sauté potatoes and lemon mayonnaise.

Spring on a plate.
It’s not that I haven’t tried other things, as often recommended. Ramson pesto: too strong by half, takes ages before everything you eat afterwards stops tasting of garlic. Ramson leaves in salad? Use one, and make it tiny; otherwise, ditto. Ramson leaves added to saute potatoes? If you’ve ever had burnt garlic, you’ll know the risk. Let’s just say I contemplated leaving home. And had to wash everything. Maybe I just have access to very strong wild garlic…

Pre-ferment bread perfection

This blog shouldn’t, strictly speaking, be called ‘twelve miles from a lemon’. Things have moved on since Sydney Smith’s day, and I’m about 500 metres from a lemon (about 3 metres if you count the ones in the fridge). No, strictly speaking it should be ‘fifty-five miles or several clicks and an interminable wait for the postie from fresh yeast’. Gripping, huh?

Yup, I ran out.

I’ve ordered some now, of course, but in the meantime I had to find a solution to my immediate bread-free problem that didn’t either involve buying boiled baby’s blankets from the Co-op, waiting a few days to revive my sourdough starter or purchasing some dried yeast which would get used once and languish in the back of the cupboard until I threw it out. I’ve been corrupted, you see, by the delights of using fresh yeast. Unfortunately it can be a pig to get.

But I remembered a friend of mine, a man who has recently returned to breadmaking, telling me about his overnight pre-ferment which used very little yeast. There were some broken bits in the container, and I weighed them out – about 5g.

So I set to. And it worked, and it worked WONDERFULLY. I make no apologies for the sudden appearance of caps; the end result justifies them. In fact, I may take to pre-fermenting my bread on a regular basis. It’s a version of the sponge method, for any other bread nuts out there.

This is what I did. And thanks, Jon!

Basic bread – with an overnight pre-ferment
Makes one large loaf

pre-ferment 1For the pre-ferment:
100g wholemeal flour
250g strong white flour
a small pinch of sugar
5g fresh yeast – a teaspoon, roughly
425ml tepid water

Mix the flours and sugar together in a large bowl. Put the yeast in a jug with the water and stir until it is blended in, then add the liquid to the flour. Stir until you have something that looks attractively like wallpaper paste. Ignore its appearance, cover the bowl with cling film and pop it in the fridge overnight.

pre-ferment 2You might think this would kill the yeasts, but no; the following morning there should be plenty of bubble action going on. Take the bowl out of the fridge and allow it to come up to room temperature.

Now for the rest of the process.

350g strong white flour
1.5 tsp salt

Mix the flour and salt together in a bowl, then add the bubbly pre-ferment. Stir everything together well, using a spoon at first if you don’t want to get too messy but hands are easier. When the mixture has begun to come together as a dough, tip it out onto a lightly floured work surface.

Start kneading, firmly pushing the dough away, bringing it back towards you and turning it as you go, and do so for 10 minutes; I set a timer or I give up too early. The texture of the dough will change – it starts to feel silky – and it should become much warmer to the touch.  Roll it into a ball, put it in a large bowl and cover with cling film. Set it aside to prove (aka rise) for about an hour or so, until approximately doubled in size.

dough in bannetonThen take the dough out of the bowl and knead it lightly once more, shaping it into a round ball (or in my case, a sort of oval ball; perhaps I was influenced in my choice by the rugby that was going on at the time).

I use French bannetons – linen-lined proving baskets which are old, well floured and were dirt cheap in Carrefour – for the next stage, but the bread can also be put into an oiled and floured tin. (Personally, I find it spreads a bit much sideways if I just put it on a baking sheet, but I am the Queen of Sloppy Dough.)

Put the dough in the basket (or whatever), untidy side uppermost. Cover it with a clear plastic bag, pulling the bag up so there is no danger of the rising dough touching the bag.*

banneton 2Leave it in a warm place to rise until doubled in size again. This may take less time, possibly about 45 minutes. In the meanwhile preheat the oven to at least 220 degrees C, GM7 – you want it as hot as you can get it, really.

Put a lightly-oiled baking tray over the top of the basket and turn it over, carefully holding the basket in place; the dough will drop down and the basket can be easily lifted off. Slash the loaf three or four times with a really sharp knife – a sharp bread knife is good, or a purpose-made blade known as a lame or grignette – and put it in the oven quickly.

bread yumBake for 30-35 minutes – until the base sounds hollow when rapped, and the top looks golden-brown and delicious.

Cool the loaf on a rack, and resist the temptation to eat the lot. Like all loaves, it slices more easily the following day, but it did have to be sampled yesterday. Especially the crust. With raspberry jam. Might have been poisoned or tasted vile. You never know…This was, after all, an experiment.

And?

Well, I have to say that I found this loaf every bit as good as my normal loaf – in fact, possibly even more flavoursome. And, of course, it is much more economical with the yeast, certainly something to consider when the fresh stuff can be so fiddly to obtain.

bread

Note:
I love Bakery Bits for potential supplies – but it’s not cheap and I tend to use it for drooling and idle speculation. On the other hand, if I find myself in a perfectly ordinary French supermarket I automatically head for the homewares section. I’ve found round bannetons, long bannetons, oval bannetons – and all linen-lined and costing a fraction of what I’d pay online or in a posh kitchen supplies shop. Sometimes they are evidently intended to have a decorative purpose, but even those which lurk among the cushions and tablecloths are usually perfectly practical. And are just a few euros.

*Plastic bag + sticky dough = unbelieveable mess. Ectoplasm. Something from Withnail’s sink – matter. Worse. Ergh.

Beautiful breakfast

There was a time when I didn’t eat breakfast… or so I said. What I did, of course, was not eat breakfast at home. Instead I would grab the early train, nip into a coffee bar by Farringdon Station, order a coffee, open my laptop and then find myself back at the counter ordering something like a croissant. Or maybe two.

But I’ve changed. It was self-employment that did it, even before I came to my senses (insight © my mother) and left London. I used to go for a swim early every morning instead of standing at the station trying not to make eye contact with anyone. When I came back I was so hungry I would eat the kitchen – and I mean the units, not merely the contents of the fridge. The only way of preventing tooth marks on the fixtures and fittings was to make sure there was something ready for me when I got back. I experimented with all sorts of cereals, porridge with and without salt / jam / sultanas, types of toast, condiments – but I never really solved the problem. So many of the packet cereals – whether they were gritty and brown or mainstream and quite sweet – seemed rather dusty. Cardboard, with dried fruit.

granola 1Then I moved here, and a friend passed on a recipe for a homemade morning – and a late evening after meeting friends in the pub – solution: a granola. I’ve made several versions since then, riffs on the theme, and have finally settled on an adaptation which I particularly enjoy. I’ve also added weights and rewritten some of the instructions, which originally included such highlights as ‘watch the pan while galaxies form and reform…’.

I make a huge quantity, and last week I ran out. Time to load up again at the wholefood co-op and find the biggest bowl in existence. And by talking to someone in the co-op I’ve found the answer to a question which baffled me but probably nobody else: the difference between muesli and granola. Muesli is uncooked and uses no fat; granola is toasted in the oven, and uses a little. Commercial granolas tend to use quite a bit; mine doesn’t.

Gorgeous granola
Makes a giant vat. I store it in a plastic box which takes 4kg of flour.

500g porridge oats
500g jumbo oats (used in two stages)
150g dessicated coconut
150g sunflower seeds
150g pumpkin seeds
75g set honey
1 tsp malt extract
100ml sunflower oil
100g flaked almonds
150g sultanas
100g dried cranberries
100g dates, chopped

Preheat the oven to 160 degrees fan, 180 conventional (but watch for a heated element at the top – may need to adjust settings to avoid this getting too hot and burning the granola) or GM 4. Take a ginormous bowl and put in the porridge oats, 400g of the jumbo oats (set the rest aside), the coconut, sunflower seeds and pumpkin seeds.

Put the honey – best measured by putting the full jar on the scales and spooning out honey until it weighs 75g less than it did – in a non-stick pan together with the malt extract. Then add the sunflower oil. Put the pan over a medium heat and melt everything together. As it reaches boiling point it will foam and rise up the pan (or alternatively start to look like galaxies forming); take the pan off the heat immediately and pour the contents into the bowl. Mix everything together thoroughly, breaking up any clumps that form.

When everything is combined, empty the mixture into some baking dishes. I generally use glass – Pyrex – ones; earthenware takes a little longer and metal roasting tins – tempting when you look at the sheer quantity – are unsuitable. Believe me #1. Don’t fill the dishes completely; you want to be able to turn the granola over and around to ensure it all toasts, and that’s difficult if you’re worried about spilling half of it on the oven floor. Believe me #2.

granola 2Bake the granola in the oven for 10-15 minutes, or until the top is starting to brown. Then take the dishes out of the oven and stir them well, bringing untoasted grains to the top. Replace them in the oven and repeat the process until all the granola is golden brown and toasty, but not remotely burnt. Warning: it speeds up towards the end and will need checking more regularly. Believe me #3.

Empty the contents of the baking dishes back into the bowl and allow the mixture to cool down completely, possibly overnight.

Considerably later or the next day, put a large dry frying pan on a medium heat and roast the flaked almonds, shaking the pan and stirring as they warm up. When they are evenly light brown in colour and beginning to smell warm and toasty, empty them into the granola bowl. Scatter in the sultanas and cranberries, then chop the dates and add them too, along with the remaining 100g of jumbo oats. Stir everything together again and put the mixture into its storage container. Hide container.

It’s delicious with yoghurt…

granloa 3One of the main reasons I love this is its sheer adaptability; the recipe above is what I prefer, but you can make it truly individual to suit personal preferences.

Adaptations I’ve tried include adding 100g each of hazelnuts and chopped brazil nuts before cooking; adding chopped dried apricots and figs after cooking; adding flaked coconut at that stage too, as well as the dessicated coconut earlier; adding sesame seeds with the other seeds (not particularly good – too small). Just one word of warning – it’s easy to make it too cloyingly sweet, and treacle and/or golden syrup: no. Or at least that’s a no as far as I’m concerned. Thank heavens I only made a smaller quantity that time!

Even more on the soup front

I am so glad that I made up a load of chicken stock, and that I firmly believe that a freezer without soup in it is just an unreasonably cold box full of the re-useable remains of natural dyeing sessions (that’s just me, possibly). Toothache turned into agony and agony turned into a removed wisdom tooth, and all I could manage for several days was soup. Soup and yoghurt. The latter got boring. The former, happily, did not.

carrot soupSo here are my two soups made at the same time as my stock, soups which gave me the left-overs to transform into stock and which stopped me starving to death in the last week. Exaggerate, moi???

The first is a spicy riff on carrot soup. I often make it, because carrots are frequently such good value, and – of course – because I love them. I’ve recently made a classic carrot soup, carrot with ginger, carrot with a little lemon, carrot with fresh coriander, carrot with chicken, carrot with – well, you get the picture. But carrot soups can sometimes be rather – not bland, exactly, but perhaps less warming than I wanted this time. So I set to work to tweak my basic recipe, and I do like the end result.

Carrot, coriander and cumin soup
serves 3-4, depending on consistency

I large onion, chopped
1 tsp vegetable oil (often rapeseed – check ingredients and go for it if it is)
a scrape of butter
1 large stick of celery, chopped
2 cloves of garlic, finely chopped
2 small potatoes
500g carrots, chopped
1 tsp coriander seeds, ground
half tsp cumin seeds, ground
200ml chicken stock
750ml liquid (water or vegetable stock)

Put a large pan over a gentle heat. Soften the onion in the oil and butter, keeping the lid on so that it doesn’t colour. Cook until transparent – about 5-10 minutes. Then take the lid off and allow the onion to colour a little for a minute, and add the celery and garlic. Peel the potatoes, chop them up and add them too. Lower the heat, add the carrots and the spices and stir everything together. Put the lid back on and cook for a further 10 minutes or so – check during this time to make sure that nothing is catching; the potato is particularly susceptible.

Add the chicken stock and cook for another 5 minutes, then add liquid to cover. Bring to the boil, then knock back the heat and cook for a further 10 minutes or so, until everything is soft and the liquid is much reduced. Blend the soup and add some more liquid to get the preferred consistency. Reheat, season and serve.

soup2And now for soup 2.

This second soup is based on one of Hugh Fearnley-Whittingstall’s recipes – but heavily adapted to suit me and what I had in the cupboards (there was no way I was going anywhere other than the dentist with a face like a football).

I used to put pulses in my soups a lot but have recently fallen out of the habit; I don’t know why. I think I’m back in it now!

Leek and bean soup
serves 3 hungry people

3 leeks
1 tsp olive oil
a scrape of butter – about half a tsp
a sprig of thyme
1 bay leaf
1 x 400g tin of flageolet beans (haricot beans can be used instead, or any white bean)
2 dried chillies, seeds shaken out
a pinch of dried herbes de Provence
100ml chicken stock
2 tsp tomato purée
water to cover

Trim the leeks, slice them lengthways and then chop them. Put them in a large bowl of water and sloosh them about to shake off any soil. Warm the oil and butter in a pan. Lift the leeks out of the water with a slotted spoon and add them to the pan, then add the leaves from the thyme and the bay leaf. Put the lid on the pan and cook the leeks down for about 5 minutes. Drain the tin of beans and chop the dried chillies finely.

Add the beans and chilli to the pan, then add a pinch of herbes de Provence as well. Stir everything together and add the chicken stock; then add the tomato purée and water to cover. Increase the heat and simmer the soup until everything is tender. This should not take long but if it seems a little thin, increase the heat again and cook some of the liquid off. Check for seasoning and serve.

Now I’m dreaming of what I will eat when I’m able. Bacon sandwich!

In praise of stock

It’s often said that good stock is the basis of good soup – and stews, and risottos, and many other things I love making, and so it is. But I’ve battled with finding a decent one. Oh, apart from Marigold’s vegetable bouillon – and even that is a bit salty for me (I don’t care for taste of the reduced salt version). In my past life, I used to bring stock cubes back from France, but that’s no longer a realistic option and, let’s be honest, it was a bit daft even when I was using the Eurostar as an extension to the Northern Line.

Recently all sorts of stock options have become available, even in my local supermarkets, but I’m still not thrilled. There are fresh stocks, coming in at about £2-3 for 300-500 ml; fresh gels at roughly the same price for a smaller quantity, but they’re more concentrated; improved cubes – I don’t really need to make my own, do I? Oh yes I do:  how appealing does this lot sound?

‘Water, Glucose Syrup, Salt, Sugar, Flavourings, Lower Sodium Natural Mineral Salt*, Yeast Extract, Chicken Fat (2.1%), Carrots, Vegetable Fat, Leek, Parsley, Gelling Agents (Xanthan Gum, Locust Bean Gum), Garlic, Chicken Powder (0.2%), Colours (Plain Caramel, Mixed Carotenes), Maltodextrin, Carrot Juice Concentrate, *Contains naturally occurring Potassium’.

That’s, by the way, a chicken stock gel, but probably the 2.1% of chicken fat and the chicken powder (???) gave the game away. And why the need for four forms of sugar: glucose syrup, sugar, caramel and maltodextrin? AND, and, and, remember the rule of ingredients lists – they’re in quantity order. So there’s more glucose syrup, salt and sugar than chicken or vegetables. Hm. Think I’ll make my own.

stock remainsBut doesn’t it take ages? That was my objection before I started, and I soon discovered that though it is a long process – and one that can be, er, fragrant – it can easily be fitted around anything else I’m doing, because 99% of the time I can just leave it to do its thing.

Another objection was that I might not have enough bits and pieces and I didn’t want to end up buying things specifically for stock – after all, part of the aim was to be economical as well avoid the chicken powder, locust bean gum and maltodextrin I didn’t particularly want to add.

That was easily addressed.

I like a roast chicken, but I love a good one. So I pay decent money and don’t have roast chicken all the time. That’s my choice, and it means that I use flavour-packed, healthy chicken. It would be criminal to throw out the remains, but one chicken isn’t enough for a decent quantity of stock – so I pick over the carcass, get rid of as much fat and skin as possible (the birds love it), and freeze the bones until I have enough.

And then I make my stock, often combining making it with cooking something else like a carrot soup which will give me other left-overs: carrot peelings, the ends of celery sticks and leeks. OK, the remains can look like something rather unpleasant, but the stock – wow, the stock.

So here goes. This isn’t an organised recipe, really, but it is seriously worth trying – and I’ll follow it in the next posts with a couple more soups I made with the start of the stock ingredients.

Chicken stock

A heap of chicken bones, the result of two or three roasts, picked over and frozen
Ditto of carrot peelings (wash the carrots first) and ends
Ditto leek – also carefully washed – or you can use an onion instead
Ditto celery…
Water

And that’s it. I might add some parsley from the garden in summer, or maybe a sprig of thyme in winter – but I go easy on the additions because they can become emphatic when frozen, and this stock is going to be frozen. That’s also why I don’t add any seasoning; the dishes eventually containing the stock can be seasoned when they’re being cooked.

I put the vegetables and the frozen chicken bones in a large casserole, cover them well with lots of water and stick the casserole on the hob. I bring it to the boil and then leave it simmering for a couple of hours over a really low heat. Of course it could go in a stove or indeed on one – I’ve a friend who simmers her stock casserole on her woodburner, but that assumes the existence of a woodburning stove with enough room above it for a casserole and a family who don’t mind the smell, because there’s no doubt that boiling up bones does smell. Not offensively, or at least I don’t find it offensive – just, um, unappealing. I don’t skim my stock at this stage; if I’ve done a good enough job of picking over the bones and washing the veg, I find I don’t need to. Then I go and do something more interesting.

When I go back, the veg are all soft and the meat has fallen off the chicken bones. This is the draining stage and is when the debris looks truly horrible. I get a large bowl and a large sieve, a bigger sieve than I think I need since my first attempt which left boiled bones on the floor, and empty the casserole into the sieve. I prop the sieve above the bowl on a couple of jars and just let it drain while I go away and – you guessed it – do something more interesting.

Then I remember, possibly an hour or so later, and give the sieve a final shake. (All the bits go in the food recycling bin; I don’t put cooked stuff or bones in my compost bins.) The bowl – now full of cold stock – is covered with cling film and put in the fridge overnight.

My fridge is cold (and quite new – my old one got tropical, ahem, but I’m more careful now) and when I take the bowl out the following morning, a layer of fat has formed on top. If I’m very careful lifting the bowl I can manage not to disturb it, and it’s consequently quite easy to remove. Then I pot up the stock into freezer containers. I use a ladle which holds 100ml comfortably, so I know that a freezer box has, say, 300ml in it. But I also fill little 100ml tubs, which are phenomenally useful. And tasty.

(Of course, the long, slow cooking that stock requires can seem uneconomic, but I don’t make stock all the time and, when I do, I make shedloads – enough to keep me going for a couple of months at least. It’s so flavoursome that I don’t need to use a lot, which is why the 100ml tubs are so good. They give a dish a depth of flavour without overwhelming everything else. Right, I’m making carrot soup – where are those bones?)

Tomato soup – the best comfort food ever?

I’ve been soooo busy. Not quite sure what I’ve been doing (apart from my tax return), but I’ve been rushed off my feet. And last weekend I suddenly had to give lunch to seven hungry spinners. Spinners of wool, ahem, not spinners on bikes – but they get just as hungry. Soup had to be one answer; it so often is at this time of year… and raiding the freezer had to be another.

Now, I admit it, I’ve a weakness for at least one tinned soup – tomato. Who hasn’t? Well, apart from people who either don’t like tomatoes, can’t eat tomatoes or who, as in my case, are lactose intolerant – my favourite, Heinz, has milk in it (‘dried skimmed milk, milk proteins’ to be exact), as many do. And most of the prepared tomato soups also are high in an ingredient which I don’t use in mine, and which is finally getting the negative press it deserves: sugar. Half a tin – half a tin – typically contains nearly 10g of sugar, 2 teaspoons. Yikes.

tomato and red pepper soupSo I recently set to work to produce as credible an imitation as I could, given certain variables, and I think I finally got there. As a result I had lots of single-portion containers stashed in the freezer, and boy did they come in handy. They weren’t all identical, as I’d been experimenting with different ways of thickening the soup, but they were close enough to work together well – and I just had enough for my starving spinners.

So here’s the recipe, and with the two most successful alternative ways of thickening the soup given: using a potato or some cannellini beans. For the latter, you can (of course) use dried beans instead of the tinned ones given in the ingredients; soak 120g overnight, then rinse and cook them until they are just soft before adding to the soup.

Tomato and red pepper soup
serves 4

1 tsp olive oil
1 large white onion, chopped
1 stick of celery, finely chopped
2 red peppers, de-seeded and chopped
2 large cloves of garlic, crushed
2 x 400g tins of chopped tomatoes
1 x 400g tin of cannellini beans, OR
1 potato, about 150g
half a tsp sweet smoked paprika (pimenton dulce)
a few thyme leaves
salt and black pepper

Warm the oil in a large casserole or pan over a medium heat and add the chopped onion. Stir it in, then put the lid on and sweat the onion for about 5 minutes; check that it isn’t catching. Then add the celery, the peppers and garlic and cook, lid off, for a further couple of minutes.

Add the tomatoes (if using whole tinned toms instead of chopped ones because that’s what you’ve got in stock, break them up in the tin first). Drain and rinse the cannellini beans, if using, or peel and chop the potato, and then add to the pan. Finally add the paprika and the thyme leaves, then stir everything together. Fill the empty tomato tins with water, swirl round to collect all the tomato juices, and add them to the pan too.

Cook, uncovered, for 20 minutes or until the peppers are soft; add a little more liquid (boiling water or hot vegetable stock) if the soup looks as though it’s going to be too thick, but try and wait until after blending because this soup is best quite thick, and it’s difficult to judge when it’s still in chunks. Blend the soup until it’s smooth, and then add more liquid to get the consistency you prefer. Reheat the soup, check for seasoning – and serve with some chunky wholemeal bread.

(On the sweet smoked paprika – it’s getting easier to find, but the most frequently stocked smoked paprika is the hotter one. The really useful sweeter version can be bought economically online if necessary, and a tin will last for ages.)